The side view changes how a ring lives with you
Low-, mid-, or high-profile ring? Compare the side view before choosing.
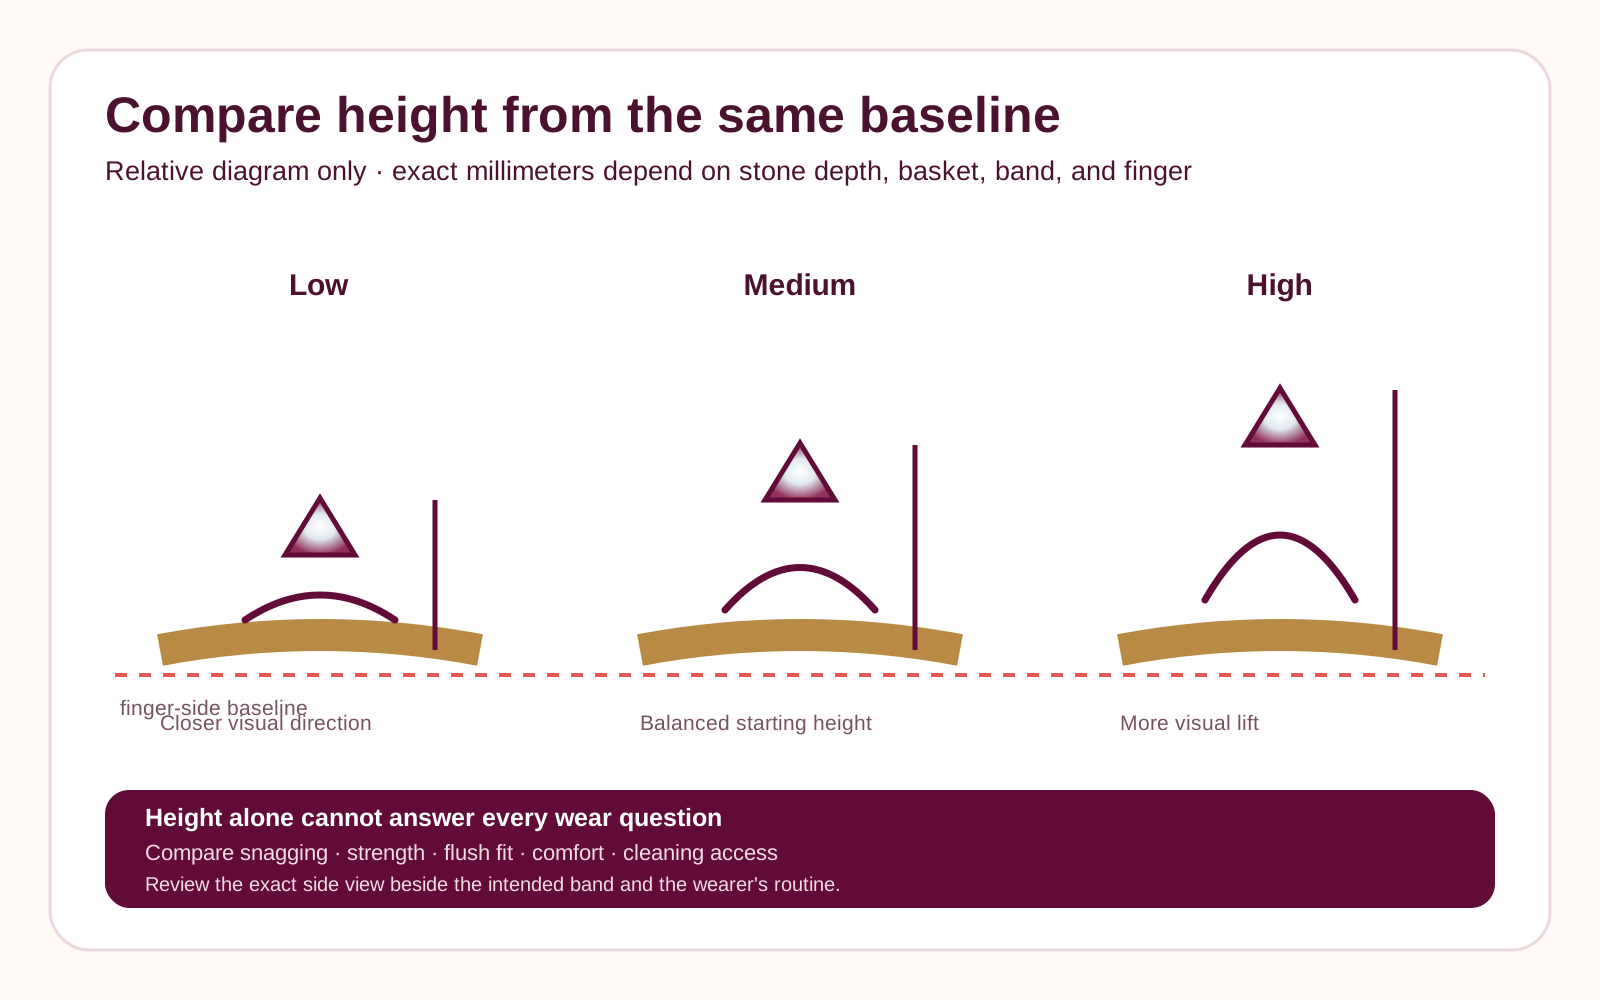
A lower direction may sit closer to the hand, while a higher direction can create more space and visual lift. Stone dimensions and the intended wedding band still need review.
Interactive setting comparison
Compare ring height from one consistent baseline
Low and high are relative directions, not universal millimeter cutoffs. The exact stone and basket decide the real side view.- LowThe center sits visually closer to the hand.
- MediumA balanced starting height keeps more than one tradeoff open.
- HighThe center gains visual lift and may create more band clearance.
A thoughtful answer before the next step
Should my ring have a low or high profile?
What matters here
Compare center height, side-view openness, snag exposure, finger clearance, cleaning access, and wedding-band relationship using true side profiles rather than decorative top views.
Real ways this can begin
Find the path that feels closest to yours
A nurse or frequent glove wearer may prefer a lower direction; someone planning a straight band or dramatic side view may explore a higher profile.
Keep what you already know, then compare the open choices without starting over.
When the direction feels ready, start a design with these preferences and continue with the next open choice.
Compare the decision in context
Compare three useful directions for low-profile versus high-profile ring settings
There is no automatic winner. Compare how “Low profile,” “Mid profile,” and “High profile” answer the same practical needs.
| Direction | Low profile | Mid profile | High profile |
|---|---|---|---|
| Works well when | Close-to-hand comfort and reduced projection lead. | You want a balance of presence, clearance, and wear. | An elevated center and open gallery suit the style and stack. |
| Reason to reconsider | A straight flush band or open side view is essential. | The exact stone requires a structure outside the middle direction. | Snagging, impact, gloves, or low-profile comfort lead. |
| Keep in the brief | Keep low, mid, and high as editable side-view directions. | Include the exact stone or realistic depth direction. | Describe gloves, pockets, work, exercise, and removal habits. |
| Review before choosing | Show whether a straight, curved, or gap fit matters. | Choose open, quiet, hidden-halo, or decorative side structure. | Keep points, corners, prongs, or rim coverage visible. |
See how the choice changes
Three ways matching ring height to wear and band plans can begin
These examples show how matching ring height to wear and band plans may begin. They are planning scenarios, not customer stories or finished-piece promises.
When “Low profile” may fit
Close-to-hand comfort and reduced projection lead.
- Direction
- Begin with the “Low profile” option, then compare it with “Mid profile” while the rest of the piece stays steady.
- Why it helps
- This keeps the leading priority clear. Before choosing, check whether a straight flush band or open side view is essential.
Why “Mid profile” is worth comparing
You want a balance of presence, clearance, and wear.
- Direction
- Place the “Mid profile” option beside “Low profile” and “High profile” so the tradeoff stays visible.
- Why it helps
- This comparison shows what mid profile adds without hiding whether the exact stone requires a structure outside the middle direction.
Before choosing “High profile”
An elevated center and open gallery suit the style and stack.
- Direction
- Keep the “High profile” option in the design long enough to test it against “Low profile” and “Mid profile.”
- Why it helps
- Keeping this direction visible lets you test it honestly. Review whether snagging, impact, gloves, or low-profile comfort lead before deciding.
Questions people ask in plain language
Answers for matching ring height to wear and band plans
Open the answer that helps with matching ring height to wear and band plans. Each response stays tied to “Should my ring have a low or high profile?”
What should I compare first for low-profile versus high-profile ring settings?
Compare two side profiles with the same stone and band, then add the intended wedding band and ordinary hand routine before choosing.
When does low profile support this design?
The comparison is useful for anyone balancing a prominent center view with hands-on comfort or planning how an engagement ring and wedding band should meet.
What could make low profile less suitable for the wearer?
Do not choose high solely for flush fit or low solely for safety; exact stone depth, basket, band shape, and wearer routine can change both assumptions.
How should everyday wear influence a low profile setting?
Lower can reduce projection, while higher may expose more of the setting. Either can work when the exact structure suits the wearer's movements and care habits.
Which structure and fit details should stay with low profile?
Before continuing, review these three details together: keep low, mid, and high as editable side-view directions; include the exact stone or realistic depth direction; and describe gloves, pockets, work, exercise, and removal habits. You can adjust each one again in Atelier.
Carry the useful details forward
Keep the brief clear when you continue
Compare center height, side-view openness, snag exposure, finger clearance, cleaning access, and wedding-band relationship using true side profiles rather than decorative top views.
Keep low, mid, and high as editable side-view directions.
Include the exact stone or realistic depth direction.
Describe gloves, pockets, work, exercise, and removal habits.
Show whether a straight, curved, or gap fit matters.
Choose open, quiet, hidden-halo, or decorative side structure.
Keep points, corners, prongs, or rim coverage visible.
A visual map of this brief
See what stays known—and what remains open
This guide begins with “Choose height through comfort, presence, and the band that may sit beside it.” The next choices stay grouped, editable, and connected to that same Atelier brief.
- Ring heightChoose the side-view height you want to compare. Stone depth and basket construction can still change what is practical.
- What should the profile work around?This stays a private routine note. It guides comparison without pretending one setting is universally best.
Start with what matters on this page
Choose a side-view height, then test it against real life
Start with low, medium, or high. Keep daily movement, the exact stone depth, and any neighboring band visible before Atelier continues.Published customer proof
Real experiences, kept separate from promises
Only approved purchase-linked reviews appear here. An illustrative scene is never presented as a customer, and one person’s experience is never treated as a promise for another piece.See what Leyloon customers have shared
Read recent shop reviews on Etsy, then come back when you are ready to shape your own setting direction.
These reviews reflect individual Leyloon service experiences. Your setting direction and quote request are reviewed on their own.