See scale before choosing
Compare diameter, drop, projection, and closure—not only a product name such as small or large.
The same millimeter size can feel different with a thin tube, thick hoop, stones, or a drop. Use the visualizer as a direction, then confirm the exact dimensions.
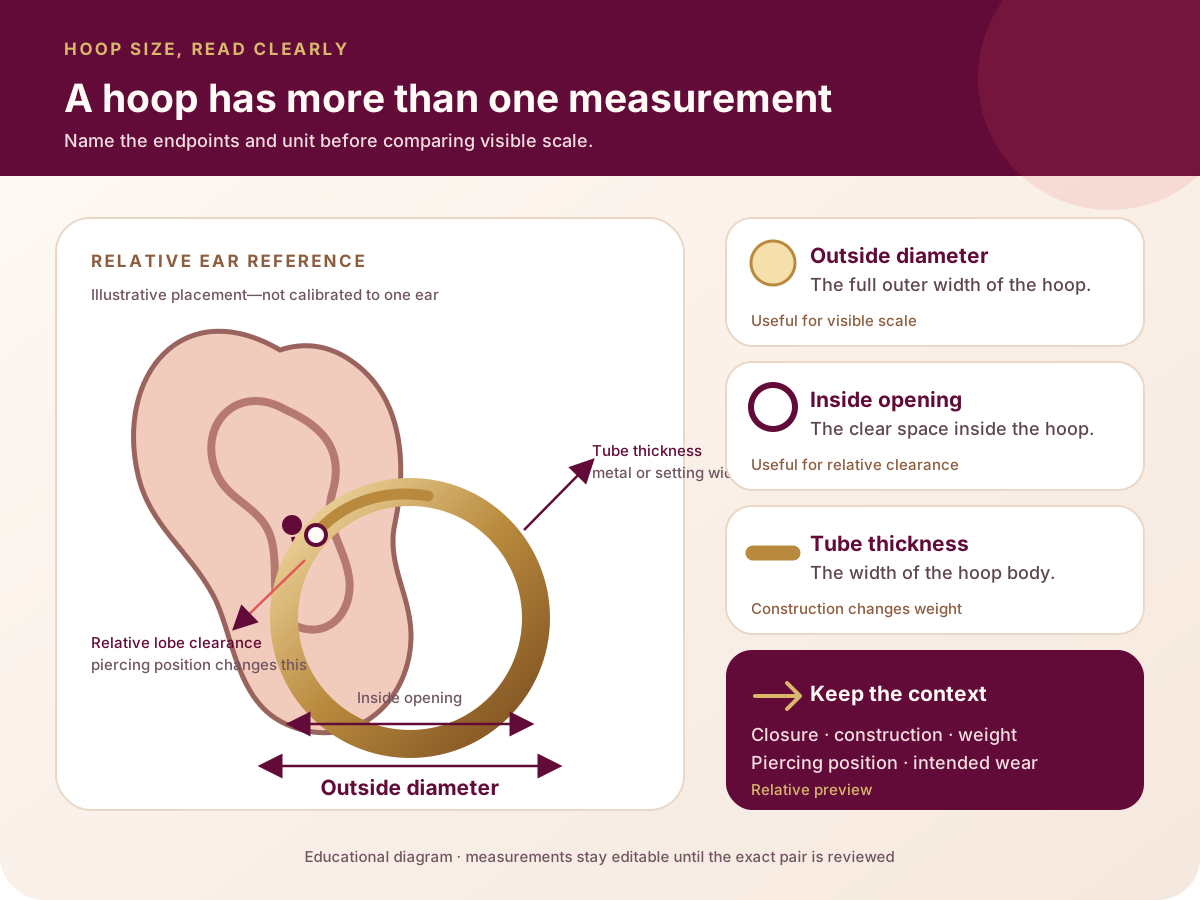
Hoop dimension lab
Compare outside diameter, inside space, and tube thickness together.
A hoop's visible size is not one number. The ear illustration is relative and cannot predict lobe clearance, weight, or fit on a particular person.These details stay private in this browser and do not appear in the public link. Every choice remains editable in Atelier.
Earring form, fit & handling
Read the hoop’s measurements before judging its scale
Separates outside diameter, inside opening, tube thickness, and relative lobe clearance so one number is never asked to explain the whole hoop.
Compare hoop outside diameter and tube thickness as a relative on-screen direction, then keep clearance, closure, weight, and construction open.
Use this page when
- You want to compare several hoop scales side by side.
- You know whether the listing uses outside or inside diameter.
Pause and choose another path when
- You expect the illustrated ear to match your anatomy exactly.
- You need comfort or weight from diameter alone.
Where this choice often matters
- Choosing an everyday hoop scale.
- Planning a statement or stone-set pair with a specific visible size.
Compare the details
Four measurements that should not be merged
Keep the measurement name beside its millimeter value so another hoop label cannot silently change what the number means.
| Measurement | Meaning | Affects | Keep open |
|---|---|---|---|
| Outside diameter | Full outer hoop width | Visible scale | Ear placement |
| Inside diameter | Open space inside hoop | Lobe clearance | Piercing position |
| Tube thickness | Metal or setting width | Visual weight | Solid/hollow construction |
| Drop | Post or hook to lowest point | Movement | Closure and total weight |
Questions worth asking
Open the concern that sounds like yours
Choose the question that sounds like yours. Each answer keeps the next step clear without closing decisions that still need review.
Will this show exactly where the hoop sits on me?
No. It is a relative direction; piercing position, lobe, and body differ.
Does a larger diameter always weigh more?
Not necessarily. Thickness, solid or hollow construction, stones, and closure matter.
Can I keep this exact scale in my design?
Yes. Carry diameter type, value, thickness, and open review questions into Atelier.
Ready when you are
Carry this direction into your design
Leyloon can keep these choices together while you continue. Every detail stays editable. Your choices stay editable as you continue.
- HoopNeeded before the direction is complete
- Measurement type and millimeter valueA useful next question
- Tube thickness and total dropKeep it open if you are still deciding
- Hoop closureKeep it open if you are still deciding
- Weight preference, piercing position, and relative-preview caveatKeep it open if you are still deciding

A visual map of this brief
See what stays known—and what remains open
This guide begins with “See earring scale through millimeters, drop, thickness, and movement.” The next choices stay grouped, editable, and connected to that same Atelier brief.
- Earring formChoose the complete silhouette family before scale and closure.
- Which hoop measurement are you comparing?Keep the measurement name beside the number. Outside diameter, inside opening, tube thickness, and relative clearance are not interchangeable.
- Visible size or dropChoose one scale family; exact dimensions and weight remain reviewable.
- Backing or closureChoose the closure as a separate comfort and security decision.
Published customer proof
Real experiences, kept separate from promises
Only approved purchase-linked reviews appear here. An illustrative scene is never presented as a customer, and one person’s experience is never treated as a promise for another piece.See what Leyloon customers have shared
Read recent shop reviews on Etsy, then come back when you are ready to shape your own wearable jewelry direction.
These reviews reflect individual Leyloon service experiences. Your wearable jewelry direction and quote request are reviewed on their own.